From now on you can find me over at
https://constancacabral.com/blog/
See you there!
13 May 2016
03 May 2015
Pausa :: Break
Ando há muito tempo com a sensação de que alguma coisa não está a funcionar no meu dia-a-dia. A tristeza e o isolamento que senti durante 2012 e 2013 felizmente desapareceram, mas não me consigo livrar de um enorme peso, de um grande cansaço e de um certo desajustamento em relação à minha vida presente.
Este blog vai ficar em pausa durante uns tempos. Não vou actualizar a página no Facebook e não me vou forçar a responder a emails. Acho que vou continuar pelo Instagram, porque é o único sítio na internet em que não sinto qualquer tipo de pressão, mas ainda não tenho a certeza.
Tenho muitos posts fotografados e alinhavados, e é possível que os vá publicando pouco a pouco, mas prefiro ter o blog inactivo e, de vez em quando, escrever umas coisas, do que um blog activo que está sempre a chamar por mim e a fazer-me sentir que estou a falhar.
Não me apetece escrever sobre isto em pormenor mas, como não gosto de cultivar uma aura de mistério nem tão pouco gerar qualquer tipo de especulação, vou acrescentar algumas palavras.
Quero viver durante uns tempos sem tecnologias. Ser mãe não é, para mim, especialmente fácil. Sou uma pessoa naturalmente introvertida, que precisa de silêncio e de algum espaço, e o dia-a-dia com crianças e sem apoio familiar tem um efeito esmagador sobre mim. Preciso de me focar, de não sentir pressões adicionais nem sucumbir a distracções. De aprender a lidar com as expectativas, aspirações e exigências da vida contemporânea.
Sinto-me constantemente sob tensão e, visto que não me apetece ter um colapso nervoso, vou experimentar alterar a maneira como vivo a minha vida.
Obrigada por me continuarem a acompanhar na minha viagem. Isto não é um adeus — é só um até qualquer dia.
I've known for a long time that something's not working in my everyday life. The sadness and isolation that I felt during 2012 and 2013 have subsided but I haven't been able to shake off a strong weight over my shoulders, a great tiredness and a sort of maladjustment in regard to my present life.
This blog is going to be still for a while. I'm not going to update my Facebook page and not going to force myself to deal with email. I might keep playing with Instagram because it's the only place online where I don't feel any pressure, but I can't say for sure yet.
I've got lots of blog posts that are already photographed and half put together and I might publish something here from time to time, but I'd rather have an inactive blog that sometimes gets updated that an active blog that's always asking for more and that makes me feel like I'm failing all the time.
I'm not in the mood to write in detail about this but, since I don't like to cultivate an air of mystery nor do I want to generate unnecessary speculation, I'm going to add a few words.
I want to live for a while with no technologies. Being a mother isn't particularly easy for me. I'm a natural introvert and I need a fair amount of silence and space. My day-to-day with children and no family support has been quite overwhelming, frankly. I need to focus and I don't need any additional distractions or pressures. I must learn how to deal better with all the expectations, aspirations and demands of modern life.
I feel I'm spreading myself too thin and since I don't want to have a nervous breakdown, I'm going to try and alter the way I live my life.
Thank you for being here with me along this journey. This isn't goodbye — it's just "see you later".
22 April 2015
Vestido de Baptizado :: Christening Gown

Durante as últimas semanas andei ocupada a fazer o vestido de baptizado do Pedro — aliás, todo o "ensemble", porque fiz o vestido propriamente dito, o vestido interior, a touca e o babete (este último não aparece nestas fotografias porque foi feito na véspera do grande dia e, mal foi posto a uso, ficou imediatamente sujo).
Foi o projecto mais elaborado, ambicioso — e, diria até, um bocadinho presunçoso — em que já me meti. Entrei nele com enormes doses de entusiasmo e inconsciência, sem ter propriamente elaborado um plano de acção meticuloso. O resultado é um vestido que me satisfaz cerca de 80%, mas no qual tenho bastante orgulho. Tentei ser o mais perfeita possível na execução e acabamentos — dentro das limitações da minha máquina de 1974, claro. Gosto do vestido? Sim. Adoro o vestido? Não. Gostei de ver o Pedro a ser baptizado com ele? Delirei!
Over the last few weeks I used up every free minute of my time to sew Pedro's christening gown — actually, I should write "christening outfit", really, because I sewed the dress, the slip, the bonnet and even a bib (which isn't pictured here because I sewed it the night before of the big event and it became soiled two seconds after I put it on Pedro).
This was the most elaborate, ambitious — and even a bit presumptuous — project I've even got myself into. I embarked upon it with a great dose of enthusiasm and naivety, without even having set a meticulous plan of action. The result is a dress that I'm 80% happy with but one that, nonetheless, fills me with a sense of pride. I tried to be as neat as I could in terms of constructing and finishing — within the limitations of my 1974 machine, that is. Do I like the dress? Yes, I do. Do I love the dress? No, I don't. Did I enjoy watching Pedro be christened while wearing it? That gave me the greatest pleasure!

Ora então vamos por partes:
1. Motivação
O Tiago e eu fizemos questão de que o Pedro fosse baptizado no país em que nasceu, mas havia o problema do vestido. Era impensável pedir à nossa família que nos enviasse um vestido antigo pelo correio (e se se perdesse?); por outro lado, nem me passou pela cabeça comprar um vestido novo. Posto isto, a única hipótese era ser eu a fazer o vestido. Há um ano assisti a uma aula de "heirloom sewing" na loja Bernina aqui da zona, onde aprendi as técnicas-base de coser rendas e entremeios bordados. Esta primeira abordagem foi fundamental para desmitificar todo o mundo do "heirloom sewing" e proporcionou-me algumas ferramentas para depois aprofundar o assunto sozinha. Durante alguns meses pesquisei vestidos antigos e técnicas modernas e, a dada altura, resolvi não pensar mais e simplesmente comecei a fazer o vestido.
Let me tell you more:
1. Motivation
Tiago and I were both extremely keen that Pedro should be baptised in the country where he was born... but what about the dress? I didn't have the guts to ask for the family gown to be sent through the post (what if it got lost?) and I didn't consider even for one minute the possibility of buying a new dress. So there was just one option: I had to make it myself. Last year I took an heirloom sewing class at my local Bernina shop, where I learned the basics about sewing laces and embroidered trims. This class was great for demystifying the whole "heirloom sewing" world and gave me a few tools to seek more information on my own. For a few months I researched old dresses and modern techniques and then there came a point where I just had to stop looking and actually start sewing.


2. Planos e materiais
Pensei em algumas opções para o vestido e fiz vários esboços, mas o desenho final acabou por ser totalmente determinado pelas limitações dos materiais ao meu dispôr. Queria que o vestido reflectisse a herança cultural do Pedro e que nele constassem elementos portugueses, neozelandeses, de família, de amigos, enfim. Estava determinada a bordar, a branco, um motivo central com corações e flores de Viana e fetos nativos da Nova Zelândia mas, com grande pena minha, isso não chegou a acontecer. Talvez se tivesse começado a fazer o vestido três meses mais cedo...
Aqui na Nova Zelândia comprei a cambraia branca, assim como o entremeio de renda e o ajour. O folho em bordado inglês foi-me dado pela minha avó e a renda com que debruei o decote e os punhos foi-me oferecida, há uns anos, por uma amiga brasileira. Os dois outros entremeios bordados foram comprados online. Fiz nervuras no peito e nas mangas com uma agulha dupla e utilizei sempre linha de algodão Mettler 60.
2. Plans and materials
I thought about a few different options but the final design ended up being entirely determined by the limited materials I had at hand. I wanted the dress to be a reflection of Pedro's cultural heritage, with elements that would reference Portugal, New Zealand, family and friends. I was determined to embroider, in white, a central motif with Portuguese folk hearts and flowers and NZ native ferns, but unfortunately I ran out of time. Maybe if I had started working on the dress three months earlier...
Here in NZ I bought the white lawn as well as the lace insertion and the entredeux. The broderie anglaise edging was given to me by my grandmother and the lace edging (or is it tatting?) was a present from a Brazilian friend many years ago. The other two embroidered insertions were bought online. I used a double-needle to make narrow pintucks on the centre front of the dress and on the sleeves and used Mettler 60 cotton thread throughout.


3. Molde
O molde que usei como base foi o Simplicity Babies 2629, vista A com mangas C (este molde é uma reprodução de um molde de 1948, e eu já o tinha experimentado há uns anos). Comecei por fazer um ensaio para ver se o tamanho 6 meses servia ao Pedro e, visto que ficava mesmo à medida, aumentei o comprimento da saia e avancei para o vestido de baptizado. Mas depois as coisas começaram a complicar-se... Quando já ia a meio do vestido, resolvi começar de novo. Apercebi-me de que seria melhor de fazer um vestido ainda mais comprido, de forma a compensar a quantidade de entremeios que resolvi usar (admito que fui gulosa e optei pela bordagem "more is better" em vez do meu habitual "less is more") e completamente aberto atrás (o molde original tem apenas uma pequena abertura atrás, mas cheguei à conclusão de que não seria nada prática para vestir e despir, nem tão pouco eficaz... o facto de o vestido ser todo aberto atrás permitiu-me pegar no Pedro ao colo de maneira a que a frente do vestido continuasse com um bom cair).
3. Pattern
I based the dress on Simplicity Babies 2629, view A with sleeves C (this pattern is a reproduction from a 1948 one and I had already used it a few years ago). I started by sewing up a test version in order to check the fit of size 6 months and, since it fit well, I just traced a longer skirt and started making the christening gown. But then things got a little more complicated... When I was already half-way through, I decided to start over. I realised that I should make an even longer dress in order to balance out the amount of insertions I ended up including in the fancy band (I admit I was greedy in wanting to show off all of my pretty trims) and one that had a completely open back (the original pattern features a short placket on the back but I quickly realised that such a small opening wouldn't be very practical when it came to dress and undress the baby, nor would it be very effective... an open back would allow me to handle Pedro much more easily and would prevent bunching up the skirt... I really wanted that fancy band to drape beautifully!).

4. Técnicas
Comecei por fazer as nervuras com uma agulha dupla e um pé calcador especial (útil, mas nem por sombras obrigatório) em rectângulos de tecido (um grande para o corpo e dois mais pequenos para as mangas), e só depois usei o molde para cortar as peças. As rendas e os bordados foram aplicados com um pé calcador normal, alternando os pontos corrido e zigzag. Consegui utilizar costuras inglesas em tudo, até na inserção das mangas, o que me deixou muito contente. A certa altura debati-me com o facto de as costuras estarem a ficar todas repuxadas mas, depois de ter limpado e oleado a máquina, mudado de agulha e voltado a enfiar a linha, o problema desapareceu. Apesar de gostar muito da minha máquina quarentona, houve alturas em que desejei ardentemente ter uma máquina moderna toda xpto, não vou mentir. Continuo a achar que há máquinas antigas bestiais (e a minha Bernina Record 830 é uma delas), mas para este tipo de "costura fina", suspeito que uma máquina moderna deva dar um jeitão.
4. Techniques
I pintucked the fabric using a double-needle and a special presser foot (which was useful, but not compulsory) before I even cut out the pattern, which means that I roughly cut one large and two smaller rectangles, pintucked them and only then did I cut out the pattern pieces for the front and for the sleeves. I sewed the laces, the entredeux and the embroidered trims with a regular foot, alternating between straight and zigzag stitching. I managed to French-seam the entire thing, even the sleeves, and that made me feel very happy and smug. I did struggle with puckered seams for a while but after I cleaned and oiled the machine, changed the needle and rethreaded it, things got much easier. Even though I love my 41-year-old machine, there were times when I felt a burning desire for a modern, top-of-the-line sewing machine, I'm not going to lie. I still believe that there are some wonderful vintage sewing machines out there (and my Bernina Record 830 is definitely one of them), but for this kind of "fine sewing" I suspect a modern machine must come in handy.

5. Acessórios
O vestido interior foi feito com base no mesmo molde, desta vez a vista F com algumas modificações. A touca é baseada num modelo antigo, também com modificações. Para ficar a condizer com o vestido, cosi-lhe umas quantas nervuras e apliquei-lhe um dos entremeios bordados que usei na barra da saia, assim como a mesma renda com que debruei o decote e os punhos.
5. Accessories
The slip was cut using view F the same pattern, with a few alterations. The bonnet was based on a vintage pattern, with a few tweaks of my own. In order for it to match the dress, I included one of the trims I used on the skirt, as well as a few pintucks and the same lace edging used on the collar and sleeves.


6. Balanço
O que me aborrece:
- O facto de o entremeio mais largo da barra do vestido não ser tão branco como os restantes (o quarto onde coso é um bocado escuro e só me apercebi do contraste quando vi estas fotografias).
- Não ter conseguido fazer o famigerado bordado — o vestido foi todo desenhado em função desse bordado e, se tivesse decidido logo à partida que não teria tempo para o fazer, acho que teria desenhado um vestido diferente.
- Ter estado tão limitada com os materiais.
- Ter cosido o vestido à pressa (por culpa minha) e com inúmeras e frustrantes interrupções (perfeitamente normais... fazem parte de ter dois filhos pequenos).
O que me alegra:
- Fiz um vestido de baptizado!
- Esforcei-me imenso e fartei-me de aprender.
- A filha de uma amiga minha ganhou dois vestidos novos (depois mostro-vos os ensaios em pormenor noutro post).
Agora estou a precisar de umas férias!
6. Final assessment
Things that bother me:
- The fact that the widest eyelet insertion on the fancy band is not as white as the other trims (my sewing room is rather dark and I only noticed the contrast when I looked at these photos).
- Not having done the whitework — especially because that was the "raison d'être" of this dress. Had I decided straight away that I wouldn't have time to make the embroidery, I think I would have designed a different dress.
- Being so limited by the materials I had.
- Having sewn the dress in such a race against time (my fault entirely) and the constant and oh so frustrating interruptions (that are perfectly natural and come with having two young children).
Things that make me happy:
- I made a christening gown!
- I strove to do my best and learned so much.
- My friend's little daughter will get two new dresses (I'll talk about my trials runs in detail on another blog post).
Now I need a break!

07 April 2015
Costura de Legado :: Heirloom Sewing

Após meses de pesquisa — uma palavra muito pomposa para descrever as horas que tenho passado na internet e mergulhada em livros, em busca de inspiração e de técnicas avançadas de costura —, comecei finalmente a fazer o vestido de baptizado do Pedro. Está a ser o meu projecto de costura mais ambicioso até à data, aquele que está a mexer mais com os meus nervos e, simultaneamente, aquele que me está a entusiasmar mais. Claro que estou entusiasmada: é a única oportunidade que tenho para fazer um vestido para os meus filhos!
Este é um vestido feito a pensar no Pedro, mas também em muitos outros bebés que um dia venham a usá-lo. Espero que venha a ser emprestado várias vezes e que dure mais de uma geração, e que seja sempre acompanhado da história do primeiro bebé que o vestiu, o tal bebé que nasceu num jardim na Nova Zelândia.
Tenho-me divertido bastante a partilhar os passos da construção do vestido no meu Instagram. A seguir ao baptizado, faço um post detalhado sobre a motivação, o processo e o resultado. Até lá — agora tenho de ir coser a todo o vapor!

After months of research — that's a rather pompous word for all the hours I spent online and with my head buried in books, searching for inspiration and heirloom sewing techniques —, I've finally started making Pedro's christening gown. This is my most ambitious sewing project to date, the one that's been playing up with my nerves the most but also the most exciting yet. I mean, how could I not be excited? It's my only chance to sew a dress for my son!
It's a dress made for Pedro but also for all the babies who will hopefully wear it one day in the future. I'm hoping that it will be borrowed several times and that it lasts more than one generation, and that it's always accompanied by the story of the baby who wore it for the first time, the baby who was born in a garden in New Zealand.
It's been fun to share the various steps of its construction over at Instagram. After the christening I'll write a detailed post about the motivation, process and result. Now I've got to get back to sewing at full-speed!
30 March 2015
Por Aqui :: Around Here


Por aqui estamos em pleno Outono, com tudo o que de bom e mau isso implica. Março é o meu mês preferido nos antípodas (equivale a Setembro no hemisfério norte) e costuma ser um mês de extremos: frio, calor, tempestades, chuva torrencial, sol radioso. Mas é a luz dourada que mais me atrai nesta altura do ano, bem como as cores das folhas das árvores, as bagas nos arbustos e a abundância de fruta e legumes.
Temos aproveitado ao máximo os dias bons para para brincar no jardim, passear, ir apanhar amoras e maçãs à beira da estrada... Infelizmente os meus passeios a pé depois do jantar já acabaram (não gosto nada de passear no escuro) e a época das febres já chegou cá a casa.
Uma nova estação traz novos ritmos, novas actividades e novas conquistas. Bem-vindo, Outono!
Around here it's autumn, with all the good and the bad this it entails. March is my favourite month in the antipodes (it's the equivalent of September in the northern hemisphere) and it's usually a month of contrasts: cold, hot, stormy, rainy, sunny. But it's the golden light that attracts me the most, as well as the leaves changing colour, the berries and the abundance of fruit and vegetables.
We've been making the most of the sunny days by playing in the garden, exploring new places, picking blackberries and apples on road verges... Unfortunately my daily walks after dinner have come to an end as I don't like walking after dark, and fever season is upon us.
A new season brings new rhythms, new activities and new milestones. Welcome, autumn!
25 March 2015
Three Baby Jumpsuits :: Três Macaquinhos de Bebé

Acho que encontrei o meu molde preferido de roupa de bebé: o Simplicity 8989 de 1970. O Pedro está a precisar de roupa de meia estação (algo que tape as pernas mas que não seja demasiado quente), por isso usei este molde para fazer-lhe três macaquinhos diferentes. O tamanho do molde é 1/2 ano e serve perfeitamente a este bebé rechonchudo de quase 8 meses.
I think I've found my favourite baby sewing pattern: Simplicity 8989 from 1970. Pedro is in need of some autumn clothes (something that covers up his legs but which isn't too warm) so I used this pattern to whip up three different jumpsuits for him. The pattern is sized "1/2 year" and it fits this almost 8-month-old chubby baby perfectly.


Fiz o primeiro numa popelina em xadrez escocês escolhida pelo Rodrigo (nem imaginam como ele ficou orgulhoso quando viu o resultado). O Tiago comentou que o Pedro, assim vestido, parece que vai para o boogie woogie... quando lhe disse que o molde era de 1970, ele não se mostrou nada admirado. Significará isto que o macaquinho ficou demasiado retro? Eu acho que ficou bem engraçado, com um certo ar de bibe de colégio. Agora que olho para ele, acho que deveria ter cortado aquelas presilhas na cintura em viés...
I made the first one in a plaid poplin chosen by Rodrigo (he was so proud when he saw the resulting outfit!). When Tiago first saw it, he commented that Pedro was clearly ready to go do the boogie woogie... and he wasn't surprised when I told him that the pattern is from 1970. Does this mean that the jumpsuit is too retro-looking? I think it turned out quite cute, it sort of reminds me of a public school uniform. Now that I'm looking at it again, I wish I had cut those button tabs on the bias...


O segundo foi feito com um tecido às florzinhas. Quando o mostrei ao Tiago, ele expressou as suas dúvidas... um rapaz vestido à menina? Mas acho que o Pedro aguenta perfeitamente este tecido — e vocês, o que acham?
I chose to make the second jumpsuit in a floral material. When I showed it to Tiago he had his doubts... a boy dressed up like a girl? But I think Pedro can totally pull this off — what about you, do you reckon that it's too girly?


Para fazer o terceiro usei um tecido indiscutivelmente masculino, que me foi enviado pela Trine há um ano. Também acho que deveria ter cortado as presilhas de outra maneira — neste caso, com as riscas na horizontal em vez de na vertical.
Veredito final: gosto imenso deste molde! É fácil e rápido de fazer (mesmo com costuras inglesas) e parece-me muito confortável. O Pedro aprova!
The third one was was made using a very masculine fabric that Trine sent me last year. I should have cut those button tabs differently... they would be much more effective if the stripes were running horizontally instead of vertically.
Final verdict: I love this pattern! It's easy and quick to sew (even with French seams) and it looks very comfortable. Pedro approves!
17 March 2015
Vestido de Praia :: Beach Cover-Up


Às vezes sinto-me o Grinch da confecção, sempre a pensar "tantos passos! isto demora um tempo louco! enfrentar os moldes, cortar os tecidos, decifrar instruções, engomar, coser, engomar, coser...". O que vale é que fazer roupa é um bocado como passar por um parto: custa mas, quando uma pessoa olha para o resultado, acha que tudo valeu a pena. Aquele fenómeno curioso da memória selectiva também acontece: as partes difíceis são apagadas e só nos lembramos do quanto aprendemos, de como crescemos, de como nos tornámos pessoas melhores...
É óbvio que estou a exagerar, mas lá que fazer roupa dá uma trabalheira, ai isso dá. Então, se aparentemente me queixo tanto (sempre em silêncio! ou será que não?...), porque é que insisto? Bem, a verdade é que fazer roupa dá imenso gozo. Mesmo que o resultado fique com ar de ter sido feito em casa, mesmo que haja mangas mal embebidas, franzidos que não deveriam existir, bainhas onduladas, pregas inconsistentes... Pegar num bocado de tecido e transformá-lo em algo para vestir é fabuloso. Uma pessoa sente-se poderosa, independente, criadora! Depois, já o disse muitas vezes e repito: o panorama do pronto-a-vestir na NZ é terrível. Sim, todos temos gostos diferentes, lá por eu não gostar não significa que seja feio... Pois claro. Mas este sítio onde vivo é um deserto. Sabem todas aquelas lojas que existem em qualquer rua na Europa? Cá não há uma única e, infelizmente, a alternativa é fraca. Bem, vou parar de dizer mal da NZ, que é um país encantador e cheio de gente boa. Como em Inglaterra praticamente não comprei roupa (aí por outras razões, como o clima e o orçamento), neste momento tenho muito pouca coisa para vestir. Isso significa que, se não consigo comprar, tenho de fazer.
Ora bem, os meus conhecimentos nesta área são limitados. Não sei alterar moldes, manipular pinças, corrigir ombros, etc. etc., por isso tenho de começar por fazer coisas simples. Em anos passados, fiz uns quantos vestidos (uns com mais uso que outros), uma t-shirt (que hei-de repetir porque a usei imenso), calças de pijama e roupa infantil. Tenho comprado muitos moldes antigos aqui na NZ (espero pôr uma série deles à venda em breve) e resolvi experimentar fazer um balandrau dos anos 80. Vamos então por pontos:
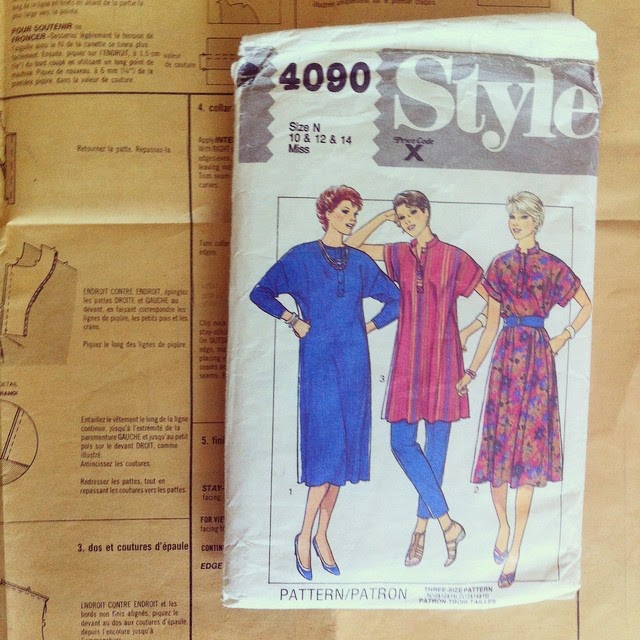
1. Molde
Style 4090 (© 1984). Eis o que me chamou a atenção: o colarinho e a carcela, as mangas kimono com aquela banda (na versão curta), o facto de ser largo e fresco. E o pormenor de ser fácil de fazer, claro. Os sacos de batatas não precisam de assentar muito bem porque, por definição, não favorecem ninguém. Minto: favorecem as pessoas muito magras, mas eu encontro-me a milhas dessa categoria... Mas a vida são dois dias e o Verão aqui é quente e húmido, e estes vestidos largos são frescos e confortáveis.
2. Tecido
Numa cidade perto da minha casa em Inglaterra, havia uma loja de tecidos que era uma autêntica caverna de Ali Babá. Tinha os habituais rolos de tecido, mas havia também uma série de cestos a abarrotar de retalhos, que eram vendidos a peso. Todos os tecidos nesses cestos tinham defeito (alguns pequenos, outros maiores). Este tecido cor-de-rosa com cornucópias cor-de-laranja veio de um desses cestos. É um tecido curioso: muito leve, difícil de coser até (andei às voltas com a tensão da minha máquina e com a pressão do calcador), que muda de cor quando é engomado (quando arrefece volta ao normal). Parece-me ser de algodão, porque não tem nem o cheiro nem o toque do poliester, e não é muito apropriado para um vestido porque é transparente. Mas como eu queria experimentar o molde, mas simultaneamente não me apetecia perder tempo com uma prova em pano cru, decidi usar este tecido. Acho que dá perfeitamente para ser usado como saída de praia.
3. Alterações
Normamente descrevo em pormenor as alterações que fiz porque acho que o meu texto poderá vir a ser útil a outras pessoas que comprem o mesmo molde (eu vou sempre espreitar o que já foi feito antes de comprar um molde). No entanto, como este é antigo e raro (não encontro uma única referência a ele na internet), acho que não vale a pena alongar-me. Assim que saltem à vista, as modificações que fiz foram não fazer casas nem pregar botões na carcela, cortar o vestido com um comprimento entre túnica e vestido abaixo do joelho (para tentar contra-balançar o volume) e aplicar um galão na bainha, porque o tecido ao longe parece liso e a barra ajuda a cortar esse efeito.
4. Notas finais
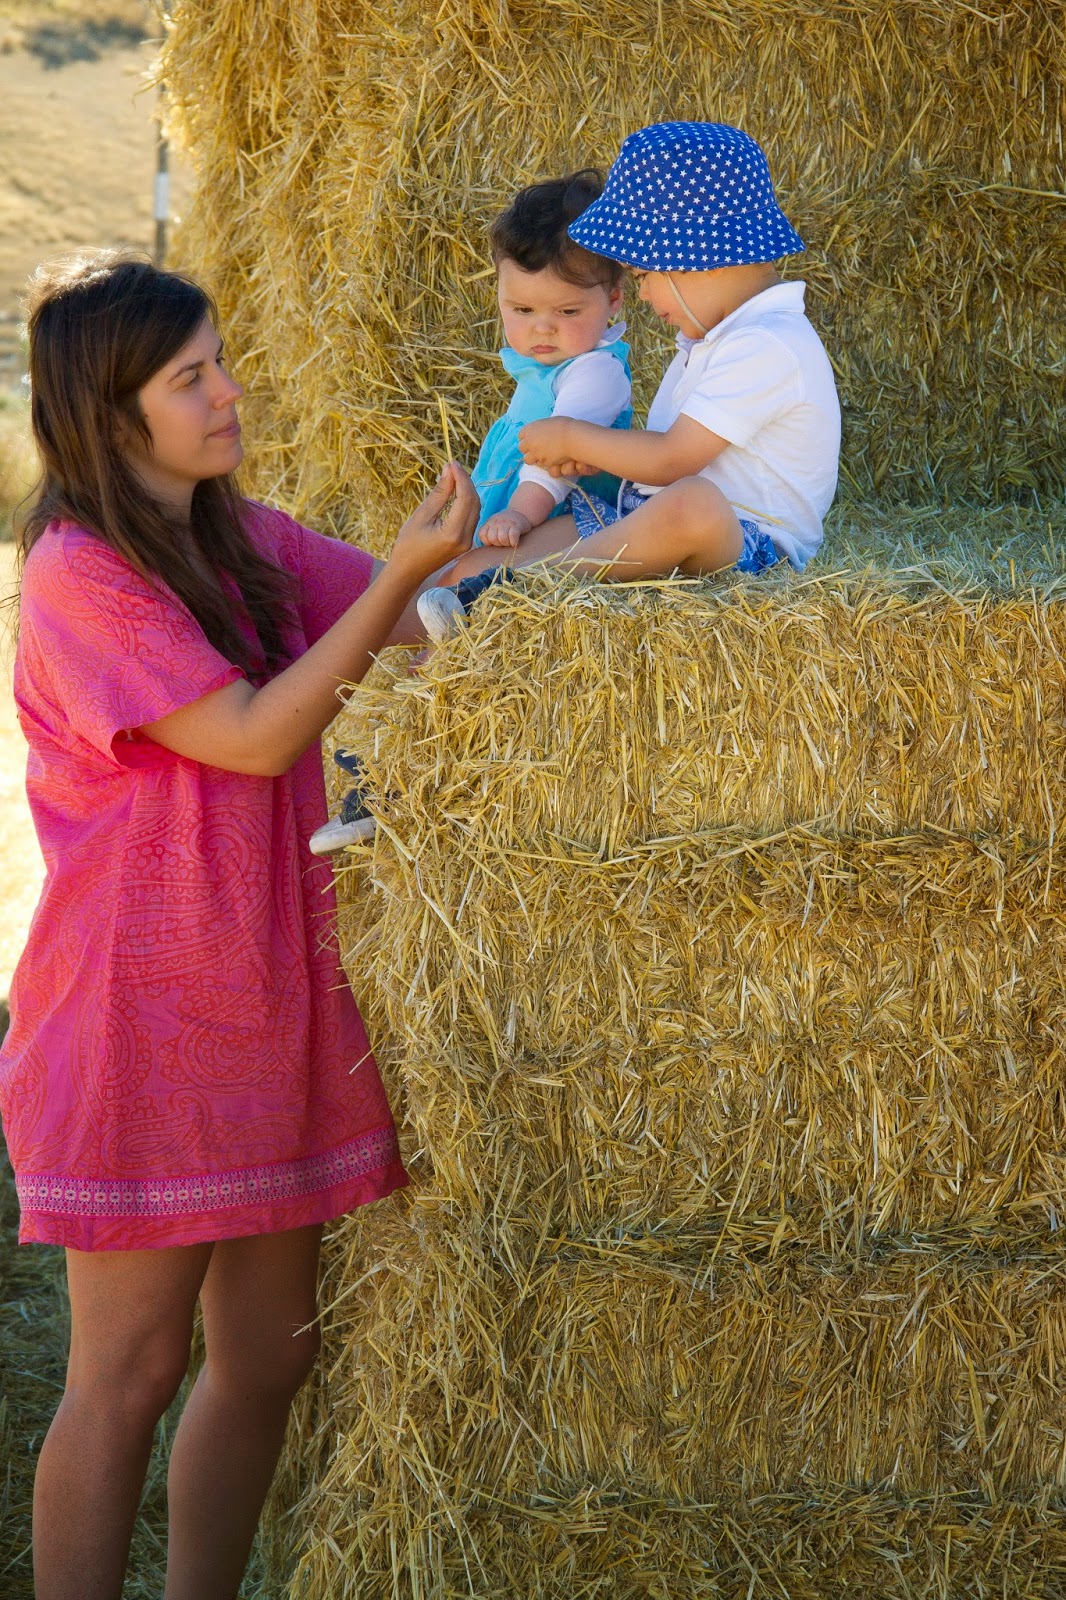
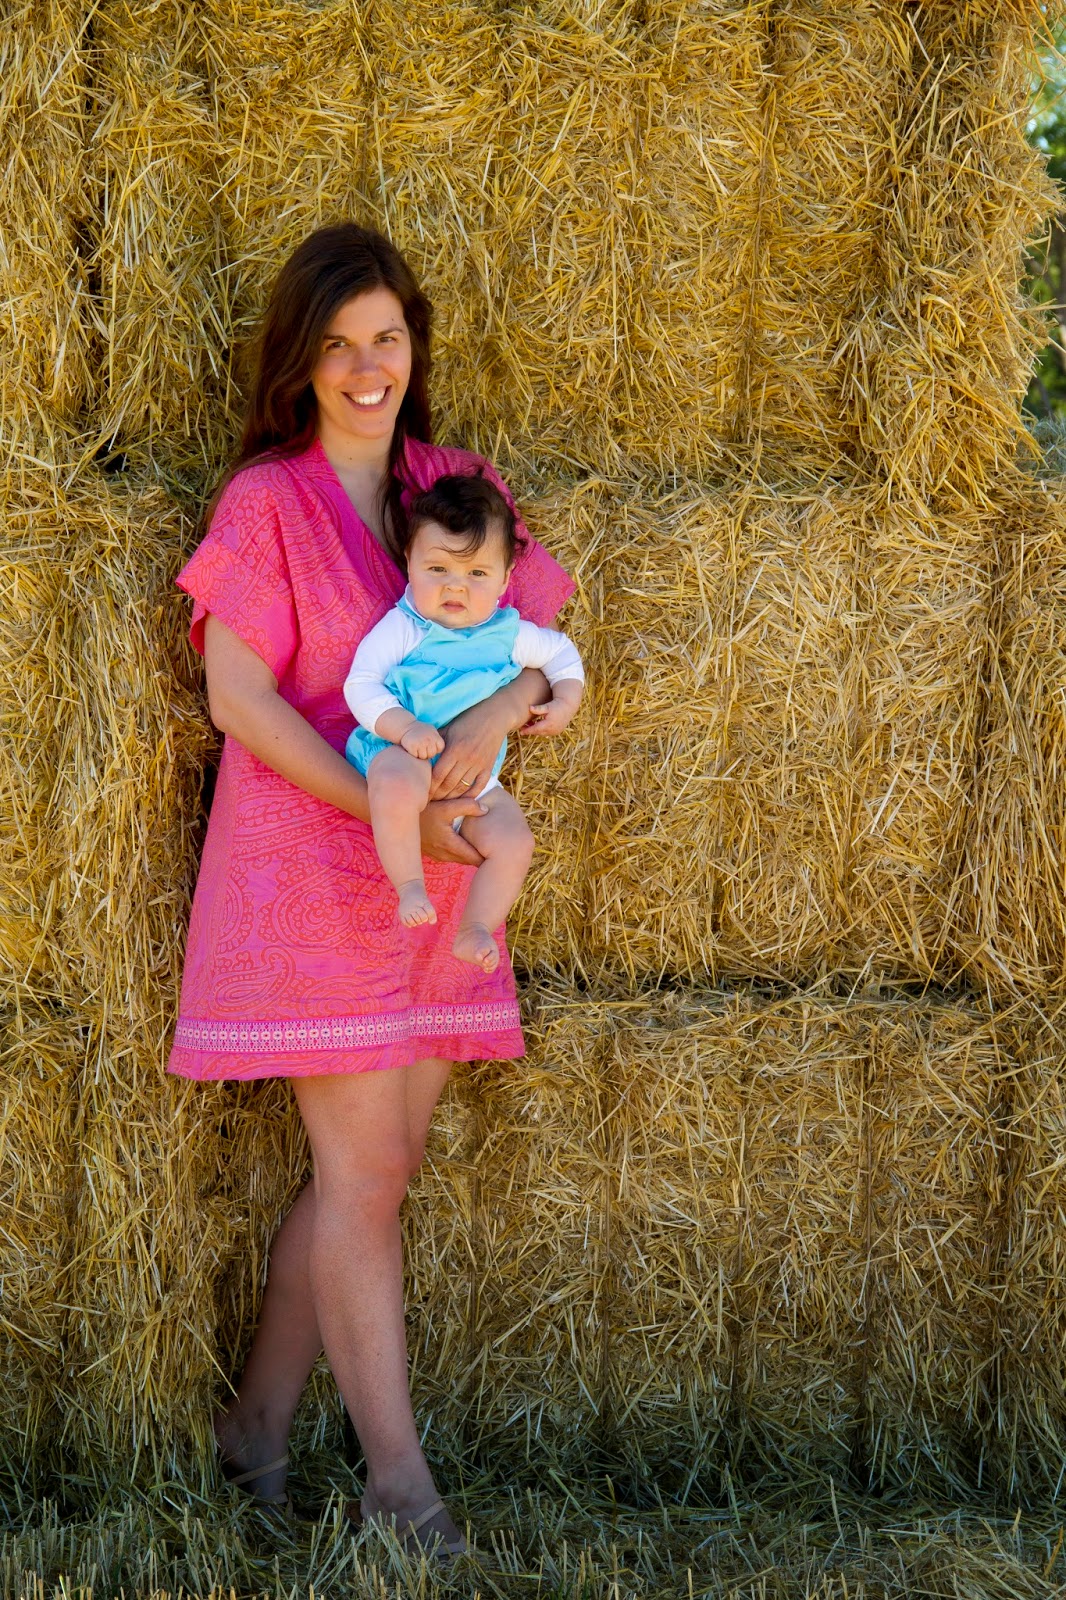
Em relação às fotografias... há qualquer coisa de ridículo nisto de nos pormos a fazer poses em frente à máquina para mostrarmos a roupa que fizemos e depois publicarmos as imagens na internet. Há quem o consiga fazer muito bem, mas eu? Nem por isso. Ainda pensei mostrar apenas as fotografias do vestido no manequim, mas não há dúvida de que a roupa ganha outra vida quando é vestida, por isso deixo aqui uns outtakes de uma sessão fotográfica que fizemos em cima de uns fardos de palha, durante as nossas férias na costa este da NZ.
Em relação às fotografias... há qualquer coisa de ridículo nisto de nos pormos a fazer poses em frente à máquina para mostrarmos a roupa que fizemos e depois publicarmos as imagens na internet. Há quem o consiga fazer muito bem, mas eu? Nem por isso. Ainda pensei mostrar apenas as fotografias do vestido no manequim, mas não há dúvida de que a roupa ganha outra vida quando é vestida, por isso deixo aqui uns outtakes de uma sessão fotográfica que fizemos em cima de uns fardos de palha, durante as nossas férias na costa este da NZ.
Enfim. Voltando ao vestido, é um saco de batatas muito confortável e vou voltar a fazê-lo, mas para a próxima num tecido melhor.
Sometimes I feel like I'm the Grinch of dressmaking: I'm always thinking things like "so many steps! I can't believe this takes sooo looong! all this dealing with the paper patterns, cutting fabric, deciphering instructions, press, sew, press, sew...". But sewing clothes is a bit like going through labour —it's painful but when you look at the result, you feel like it was all worth it. That curious phenomenon of selective memory also occurs: all the difficult bits are wiped out and you only recall everything you've learned along the way, how much you've grown as a human being, how you're a much better person now...
I'm kidding, of course, but let's all agree that making clothes is indeed a lot of work. So if I keep whining about it (in silence! or maybe not?...) why do I insist on doing it? Well, the fact is that making clothes is great. Even if the resulting garments look homemade, if the sleeves aren't properly set in, if you can spot the odd puckering, if the hems are a bit wavy, if the pleats are inconsistent... Taking a flat piece of fabric and turning it into something you can actually wear is fabulous. You feel powerful, independent, the creator of something! In addition to this and as far as I'm concerned, shopping for clothes in NZ is hard. I know we've all got different tastes and I don't want to say bad things about NZ, as it's a wonderful country filled with good people. But I haven't bought new clothes for years so, at the moment, I haven't got much to wear. That means that, if I can't buy, I must sew.
Well, my skills in this area are very limited, I can't alter a pattern and I am incapable of shifting darts, correcting shoulders, etc. etc., so I have to start by making simple clothes. In past years I've sewn a few dresses (some of which have been worn more than others), a t-shirt (which I must make again because I wore that one until it almost fell apart), pyjama bottoms and children's clothes. I've been buying lots of vintage patterns (I'm hoping to put some up for sale soon) and I decided to try making a 1980s potato sack. Let me tell you all about it:
1. Pattern
Style 4090 (© 1984). Here's what caught my eye: the collar and placket, the kimono sleeves and that band (in the shorter version of the sleeves), the fact that it's loose and therefore cool. And, of course, the fact that it's easy to sew. Potato sacks don't have to fit very well because they aren't flattering on anyone. No, I'm lying: they do look great on skinny women but since I'm miles away from that category... But you know what? Life is short and summers in NZ are hot and humid, and dresses like this one are cool and comfortable to wear.
2. Fabric
In a city near my house in England, there was a fabric shop that was a real Ali Baba cave. In addition to the usual rolls of fabric, there were these baskets with remnants that were sold by weight (every remnant had some kind of flaw). This fabric came from one of those baskets. It features orange paisleys on a hot pink background and it's a funny sort of material: very lightweight, quite hard to sew (I had to mess around with both the tension in my machine and the pressure of the foot) and it changes colour when it's pressed (as soon as it cools down it goes back to normal). It looks like cotton to me because it doesn't smell or feel like polyester, but I can't be sure, and it's not really appropriate for a dress because it's sheer. But I really wanted to try out this pattern and I wasn't feeling like making a toile out of, you know, muslin, so I went with it anyway. I think it's perfectly acceptable as a beach cover-up.
3. Alterations
Usually I write about all the alterations I've made to the pattern I'm blogging about because it might be useful to someone who's contemplating using the same pattern (before I start sewing something I'll always look for how people have interpreted the pattern in question). However, since this is an old and apparently rare pattern (I can't find anything online about it), I'll be brief: I skipped the buttons and buttonholes on the placket, I cut the length somewhere between tunic and dress (to balance out all that volume) and I stitched a jacquard ribbon near the hem.
4. Final notes
In regard to photographs... I can't help but feel that there's something a bit ridicule about this whole thing of posing for clothes photos and posting about them on the internet. Some people can get away with it — but me? Not really. So I thought of only showing you the dress on the dress form but that felt a bit short... clothes do get a new life when they are being worn by a person. So here are a couple of outtakes from a photo session we did during our holidays on a hay field.
Anyway, back to the dress. It's a very comfortable potato sack and I'll make it in a better fabric next time.
16 March 2015
Bolachas Sem Glúten :: Gluten-Free Biscuits

No mês passado fui passar uma manhã a casa de uma amiga. Como não gosto de aparecer em casa de alguém de mãos a abanar, resolvi levar-lhe umas bolachas. No entanto, a minha escolha de bolachas estava limitada por um factor importante: esta minha amiga não come coisas com glúten.
Na minha pesquisa online de receitas de bolachas sem glúten, apareceram-me muitas hipóteses com ingredientes estranhos e difíceis de encontrar. Mas não era nada daquilo que eu estava à procura... não me apetecia nada fazer uma receita cheia de substituições — queria simplesmente umas bolachas simples e honestas. A verdade é que cá em casa temos a sorte de não nos termos de preocupar com restrições alimentares (pelo menos por enquanto), por isso toda a ciência por trás das substituições ultrapassa-me... mas conheço um caso grave e nem imagino como deverá ser difícil ter de lidar com alergias perigosas diariamente.
A certa altura deparei-me com esta receita da Martha Stewart. Foi perfeita para a ocasião porque não utiliza farinha de trigo, só aveia, e as bolachas são deliciosas. Deixei de fora as passas e o extracto de baunilha e certifiquei-me de que as bolachas ficaram bem cozidas antes de as tirar do forno (eu normalmente tenho tendência para cozer de menos as bolachas, porque gosto delas relativamente moles, mas estas desfazem-se se não ficarem bem cozidas).
Na semana passada voltei a fazê-las, desta vez para uma senhora que está muito doente. E, mais uma vez, apercebi-me da razão pela qual gosto tanto de oferecer coisas feitas em casa. Há um envolvimento e um empenho dificilmente equiparáveis ao acto de comprar algo já feito. Claro que não temos necessariamente de fazer bolachas — pode ser uma carta, um desenho, um ramo de flores, uma almofada de alfazema. Ao oferecermos algo feito por nós, estamos a oferecer uma pequena parte de nós próprios. E é isso que torna o presente tão especial.
Last month I spent a morning at a friend's house. Since I don't like showing up at someone's door without something on my hands, I thought I'd bake her some biscuits. However, my choice of biscuits was limited by a very important factor: my friend doesn't eat gluten.
While I was searching online for a gluten-free recipe, I stumbled upon many options with strange or hard to find ingredients. But that wasn't what I was looking for. I didn't want a recipe full of substitutions — I just wanted to bake simple, honest biscuits. In our family we're incredibly lucky not to have to deal with any allergies (at least for now) so the whole science behind substituting ingredients is very foreign to me... but I do know of one serious case and I can't even imagine what it must be like to have to deal with dangerous allergies everyday.
Eventually I came across this Martha Stewart recipe. These cookies are wonderful! I left out both the raisins and the vanilla extract and I made sure the cookies were fully cooked before I took them out of the oven (usually I tend to under-bake cookies because I like them on the softer side but these are too crumbly if they're not well done).
Last week I made them again, this time for a lady who is very sick. And I found myself reflecting once again on why I love giving away homemade things. When we make something for someone with our own hands, there's a special involvement and effort that are hard to compare with something bought in a shop. Of course you don't have to bake if you're not into that —you can write a letter, make a drawing, put together a simple bouquet of flowers, sew a little lavender sachet. When you give away something made with your own hands, you're of giving away a small part of yourself. And that's what makes it so special.
13 March 2015
Coser para Raparigas :: Sewing for Girls


A Patrícia, que escreve o blog Pequeno Mundo a Três e que organizou o nosso movimento de coser por uma boa causa, é mãe de duas pequenitas: uma com três anos e outra que irá nascer muito em breve. Lembrámo-nos de a surpreender com uma espécie de baby shower virtual, em que cada uma de nós escolheu fazer uma ou mais peças para o bebé, para a irmã mais velha e/ou para a mãe.
Eu fiquei bastante entusiasmada com esta oportunidade de fazer roupa a condizer para as duas irmãs. Gosto muito de coser para os meus rapazes mas, digam o que disserem, coser para raparigas é muito mais giro!
A minha selecção do tecido e dos modelos não foi imediata, porque nem todos temos o mesmo gosto e tive medo de que a Patrícia não se revisse nas minhas escolhas... Depois de muitas indecisões, resolvi fazer como se fosse para mim e escolhi uma popelina com um padrão muito veranil (espero que a Patrícia não ache aquele amarelo-limão-quase-fluorescente e aquele roxo demasiado avant-garde para um bebé) e dois modelos diferentes de macaquinhos.
O molde do macaquinho de bebé vem na revista finlandesa Ottobre 3/2011. Já o tinha feito no tamanho 9 meses para umas gémeas (aqui), mas desta vez experimentei fazê-lo para 3 meses. Acrescentei um vivo no mesmo tom de amarelo do tecido e cosi tudo com costuras inglesas.
O molde do macaquinho de criança vem na Burda Style Kids 3/2014 e parece-me ideal para levar para a praia ou para brincar ao ar livre num dia de muito calor. Andei à procura de um cordão amarelo para a cintura mas, como não consegui encontrar nada de jeito, resolvi utilizar a mesma fita de viés que usei para fazer os vivos do macaquinho de bebé. Foi a primeira vez que usei um molde da revista Burda e, passada a confusão inicial, a coisa até nem correu mal.
Adorei fazer estas duas peças e vou continuar a fazer roupa para raparigas sempre que tenha oportunidade para isso. Muitos parabéns, Patrícia, espero que gostes dos nossos presentes!
Não deixem de espreitar tudo aquilo o que a Rita, a Marta, a Ana Sofia, a Inês, a Carla, a Soraia, a Maria João, a Sara e a Magda fizeram!
Patricia —who writes the blog Pequeno Mundo a Três and who organised our sewing for charity last Christmas — is the mother of two little girls: a 3-year-old one and a little baby who is about to be born. We thought we'd surprise her with a kind of virtual baby shower, where each of us would sew a few gifts for the baby, the older sister and/or the mum.
I was pretty excited about this chance to sew matching clothes for two sisters. I love sewing for my boys but, let's face it, sewing for girls is a lot more fun!
I had some trouble selecting both the fabric and the patterns... Because we humans don't all share the same taste, I was afraid that Patricia wouldn't like my choices. After much indecision I just went with my gut and picked a floral poplin in bright colours (I'm hoping that Patricia won't find that almost-neon-yellow and that purple too avant-garde for a baby) and two different styles of playsuits.
The pattern for the baby playsuit is from the Finnish magazine Ottobre 3/2011. I'd already sewed it once in size 9 months for baby twins (blogged) but this time I went with the 3 months sizing. I added piping in the same acid yellow that's featured in the fabric and I French seamed everything.
The pattern for the toddler playsuit is included in Burda Style Kids 3/2014 and I think it's perfect for a trip to the beach or for playing outdoors in a hot day. I searched for a yellow cord for the waist casing but couldn't find anything suitable, so I went with the same bias tape I used to make the piping for the baby playsuit. It was the first time I tried sewing from a Burda pattern and as soon as I conquered my fear, everything went quite smoothly.
10 March 2015
Me @ Faça Fácil Costura Profissional


No último número da revista Faça Fácil Costura Profissional há uma pequena entrevista comigo. Fiquei muito contente por ter recebido este convite e gostei imenso de ver o resultado. Muito obrigada à equipa da Faça Fácil!
There's an interview with me in the last issue of the Portuguese magazine Faça Fácil Costura Profissional. I was very happy to get this request and I love how it turned out. Thank you to everyone at Faça Fácil!
Subscribe to:
Posts (Atom)